Do you remember the sound of plastic wrap? It used to mean food was fresh. Now, it reminds us of plastic waste. DIY beeswax wraps are a new way to store food without plastic.
Imagine being in your kitchen, surrounded by beeswax’s warm smell. You’re making something useful and lovely. Making beeswax wraps is more than just food storage. It’s about caring for our planet.
In 2020, people started looking for plastic alternatives. Beeswax wraps became popular for storing food. They’re made from cotton and beeswax, making them safe and green.
Want to help the planet in your kitchen? Let’s explore beeswax wraps. We’ll see their benefits, learn how to make them, and why they’re loved in America. Start your green journey with us, one wrap at a time.
Overview of DIY Beeswax Wraps
Beeswax wraps are becoming more popular as a green choice for kitchens. They are made from fabric coated with beeswax. This makes them flexible and great for sealing food or containers.
Definition of Beeswax Wraps
Beeswax wraps are simple and work well for keeping food fresh. They are made from cotton fabric with beeswax. This makes them a natural, reusable barrier against air and moisture.
Making these wraps at home is quick. It takes less than 10 minutes per wrap.
Importance of Sustainable Food Storage
Switching to sustainable food storage is key to reducing plastic waste. Beeswax wraps are a green option that fits with zero waste kitchens. They can last up to a year with the right care.
By making your own beeswax wraps, you save money and can customize them. You’ll need cotton fabric, beeswax pellets, and basic tools. The process involves melting beeswax on fabric in a 350°F oven. This DIY method helps you live more sustainably.
History of Beeswax Wraps
Beeswax wraps have a long history. They started with old ways and grew into a new, green choice for homes today.
Traditional Uses of Beeswax
For centuries, beeswax was used to keep food fresh. Long ago, people knew it kept water out and stopped bacteria. Beekeepers got about 1 to 2 pounds of wax for every 100 pounds of honey.

Evolution into Modern DIY Solutions
In 2008, Toni Desrosiers and Colin created Abeego. They started with just $1200. Their product changed how we store food.
They didn’t patent it, letting others help grow the idea. Now, beeswax wraps are a big hit for those wanting to use less plastic. They’re good for keeping food safe and are a green choice for kitchens.
Benefits of Using Beeswax Wraps
Beeswax wraps are a great choice for those who care about the planet. They are better than plastic bags in many ways. This makes them perfect for living in a way that’s good for the Earth.
Environmental Impact
Beeswax wraps are good for the environment. In the U.S., families use a lot of plastic bags. These wraps can help cut down on that waste.
They are made to break down naturally. This means they won’t harm the environment when they’re no longer needed.
Cost-Effective Plastic Alternative
Beeswax wraps might cost more at first. But they last a long time. One wrap can last a year, which is like using 200 plastic bags.
This saves you money and helps the planet. It’s a smart choice for your wallet and the Earth.
- Lasts up to 200 uses
- Replaces hundreds of single-use plastic bags
- Saves money over time
Choosing beeswax wraps is a small step that makes a big difference. They are a smart, affordable way to fight against plastic waste. This shows that caring for the Earth can be easy and smart.
How to Make DIY Beeswax Wraps
Making your own beeswax wraps is a fun DIY project. They are a great alternative to plastic wrap and help reduce waste. Let’s look at what you need and how to make them.
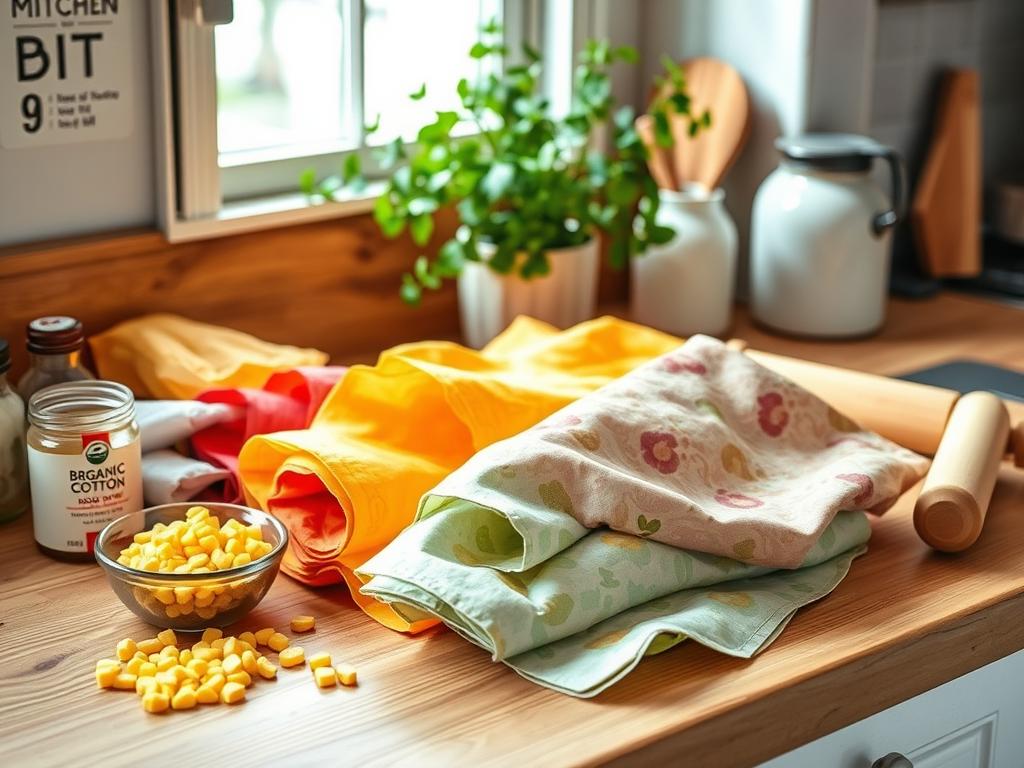
Materials Needed
To make DIY beeswax wraps, you’ll need these items:
- 1 ½ yards of 100% organic cotton fabric
- 1 cup organic beeswax pellets
- 2 tablespoons organic jojoba oil
- 6 tablespoons food-grade pine resin
- Parchment paper
- Baking sheet
- Paintbrush
- Pinking shears

Step-by-Step Guide to Creation
Here’s how to make your beeswax wraps:
- Preheat your oven to 300°F.
- Cut your fabric into the sizes you want using pinking shears.
- Melt the beeswax, jojoba oil, and pine resin in a double boiler for 30-40 minutes.
- Place a piece of fabric on a parchment-lined baking sheet.
- Brush the melted mixture evenly over the fabric.
- Bake for 3 minutes, then flip and add more wax if needed.
- Bake for another 3 minutes.
- Hang to dry for 5-7 minutes.
Let your wraps cure for 24 hours before using them. With proper care, they can last up to a year. Wash them in cold water with gentle soap and air dry to keep them effective.
Caring for and Reusing Beeswax Wraps
Beeswax wraps are great for a zero waste kitchen. They can last a year or more with the right care. This makes them a good choice instead of single-use plastics.
Cleaning Methods
To clean your wraps, use cold water and mild soap. Wash them gently with a soft sponge. Don’t use hot water, as it can melt the wax.
After washing, let your wraps air dry or pat them dry with a clean towel.
Best Practices for Longevity
Keep your wraps in a cool, dry place when not using them. You can store them flat or rolled up. Don’t put them near heat or direct sunlight, as it can soften the wax.
If your wraps lose their grip, you can re-wax them. This means melting more beeswax on the fabric. When they can’t be used anymore, you can compost them or use them as a fire starter. This reduces waste even more.
By following these care tips, your wraps will last longer. This helps your zero waste kitchen goals. Remember, small actions like using beeswax wraps can make a big difference in reducing plastic waste.
Applications of Beeswax Wraps
Beeswax wraps are great for a green kitchen. They replace plastic and are good for many things. You can use them to store leftovers or make snack pouches.
Food Storage
Beeswax wraps keep food fresh. They’re perfect for wrapping fruits, veggies, and cheese. They let food breathe, keeping it fresh longer.
They’re also good for sandwiches. They keep them dry and neat for lunch or picnics.

Covering Dishes and Bowls
These wraps are perfect for covering dishes and bowls. Just warm them up with your hands to fit them. Beeswax wraps are great for odd shapes that are hard to cover.
You can use beeswax wraps to:
- Seal mason jars
- Cover leftovers in bowls
- Wrap cheese to prevent sweating
- Store herbs and salad leaves in the fridge
- Create makeshift bowls for camping
Always clean your wraps with cool water and mild soap. Let them air dry and store them in a clean, dry spot. With the right care, they’ll last for months.
Comparing Beeswax Wraps with Other Storage Solutions
Beeswax wraps are a big deal for a green kitchen. They beat out plastic wrap and other options in many ways.
Benefits Over Plastic Wrap
Beeswax wraps last up to a year with the right care. This makes them cheaper over time. They’re also better for the ocean since they break down naturally.
They don’t have bad chemicals like plastic wraps do. This makes them safer for your food.
These wraps keep food fresh longer because they breathe. They’re great for cheese, bread, and fruits. The Bee’s Wrap Three Pack is a top pick for its flexibility.
Ecosystem Impact of Alternatives
Beeswax wraps are better for the planet than silicone lids. They’re made from organic cotton, beeswax, and jojoba oil. This makes them safe for food and good for the environment.
They might cost more upfront, but they save money and the planet in the long run. They’re a smart choice for eco-friendly living.
Challenges in DIY Beeswax Wraps
Making DIY beeswax wraps is rewarding but has its challenges. Knowing these helps you make better wraps and avoid mistakes.
Sourcing Quality Beeswax
Finding good, food-grade beeswax is key for effective wraps. Look for local beekeepers or trusted online sellers. Pure Canadian beeswax is often the best choice. The quality of the wax affects how well your wraps work and last.
Common Mistakes to Avoid
When making DIY beeswax wraps, watch out for these common errors:
- Using too much or too little wax, making wraps too stiff or not coated enough
- Choosing the wrong fabric (use 100% cotton with a tight weave)
- Incorrect wax-to-fabric ratio
- Improper melting techniques
Getting good at DIY beeswax wraps takes practice. Try different recipes and methods to find what works best. A common mix is 1 part beeswax, 1 part jojoba oil, and ¼ to ½ part tree resin. With practice, you’ll make wraps as good as store-bought ones, saving money and reducing plastic waste in your kitchen.
Learn more about making yourown beeswax wraps
Future of Beeswax Wraps in Sustainable Living
Beeswax wraps are becoming key in sustainable living. More people are using them in their zero waste kitchens. They show a green choice over single-use plastics.
Trends in Eco-Friendly Products
Beeswax wraps are at the forefront of eco-friendly kitchen items. They’re made from organic cotton, beeswax, resin, and jojoba oil. With care, they can last a year.
Unlike plastic, which takes ages to break down, beeswax wraps are biodegradable. They can even help soil health when they decompose.
Community Adoption and Local Initiatives
Local groups are getting into beeswax wraps for their zero waste kitchens. Workshops on making your own wraps are becoming common. They bring people together in the fight for sustainability.
By picking beeswax wraps, people help small businesses and cut down on plastic waste. This supports local economies and helps the environment.
As plastic pollution’s dangers become clearer, beeswax wraps are seen as a safer option. They don’t have harmful chemicals like BPA. Plus, they keep food fresh naturally.
Beeswax wraps are also very versatile. They fit many uses in the kitchen. This makes them a big part of the sustainable living movement.
Notes
How to Make Your Own Beeswax Wraps, Making your own beeswax wraps is a simple and effective way to transition away from plastic wrap in your kitchen. With just a few basic ingredients and some DIY effort, you can create reusable, eco-friendly wraps that will keep your food fresh for days. In this article, we’ll guide you through the process of making your own beeswax wraps at home.
Materials Needed, To get started, you’ll need a few basic materials: beeswax, jojoba oil, cotton fabric, and a pair of scissors. You can source these materials from local craft stores or online suppliers. Beeswax is available in various forms, including blocks, pellets, or sheets, so choose the one that works best for you. Jojoba oil adds flexibility and durability to the wraps, while cotton fabric provides a comfortable touch.
Preparing the Cotton Fabric, Before you can start making your wraps, you’ll need to prepare the cotton fabric. Cut a piece of fabric into a rectangular shape, approximately 12 inches by 12 inches. This size will give you enough room to wrap around most containers. You can use a single layer of fabric or add multiple layers for added durability.
Applying Beeswax, Now it’s time to apply the beeswax. Melt the wax in a double boiler or a dedicated wax melter, then brush it onto the cotton fabric using a spatula or a cloth. Make sure to cover the entire surface evenly, but don’t overdo it – too much wax can make the wraps stiff.
Adding Jojoba Oil, Once the wax is applied, add a small amount of jojoba oil to the wrap. This will help flexibilize the fabric and prevent cracking. Use a brush or a cloth to apply the oil evenly, making sure not to overdo it – too much oil can make the wraps slippery.
Assembling the Wraps, Now that you have your prepared cotton fabric and applied beeswax, it’s time to assemble your wrap. Place the fabric around a container, such as a jar or a plate, and press the edges together to create a tight seal. Use a bit of wax or oil to secure the edges if needed.
Tips for Using Your Beeswax Wraps, To get the most out of your homemade beeswax wraps, here are a few tips: keep them clean by washing with soap and water, dry thoroughly before storing, and avoid using abrasive cleaners or scrubbers. You can also iron your wraps to restore flexibility if they become stiff.
Sustainable Kitchen, Making your own beeswax wraps is just one step towards creating a more sustainable kitchen. By reducing your reliance on plastic wrap and embracing eco-friendly alternatives, you’ll be contributing to a healthier environment for yourself and future generations. In this article, we’ve covered the basics of making your own beeswax wraps – now it’s time to get creative and start wrapping up!
Plastic Alternative, Beeswax wraps offer a perfect alternative to plastic wrap in the kitchen. Not only are they reusable, but they’re also biodegradable and compostable. By choosing this eco-friendly option, you’ll be reducing your carbon footprint and promoting sustainability in your daily life.
DIY Eco-Friendly, Making your own beeswax wraps is a DIY project that celebrates creativity and self-sufficiency. By taking the time to craft your own wraps, you’re not only saving money but also contributing to a more sustainable future. This article has shown you how easy it is to make your own beeswax wraps at home – now it’s time to get wrapping!
FAQ
Q: What are beeswax wraps?
A: Beeswax wraps are a green choice for food storage instead of plastic wrap. They’re made from fabric coated with beeswax. This makes them moldable and reusable for food and containers. They’re also washable and free from chemicals, helping to cut down kitchen waste.
Q: How do you make beeswax wraps at home?
A: To make beeswax wraps, you need cotton fabric, beeswax pellets, and optional jojoba oil and pine resin. You’ll also need parchment paper and kitchen tools. First, melt the beeswax mix, then apply it to the fabric. Let it cool and set, either in the oven or with an iron.
Q: How long do beeswax wraps last?
A: With the right care, beeswax wraps can last up to a year. They need to be re-waxed or replaced after that. How long they last depends on how often you use them and how well you take care of them.
Q: How do you clean beeswax wraps?
A: Clean beeswax wraps with cold, soapy water and a soft sponge. Don’t use hot water, as it can melt the wax. Dry them with air or a towel. Store them flat or rolled in a cool, dry place for the best results.
Q: What are the environmental benefits of using beeswax wraps?
A: Beeswax wraps are great for the environment because they cut down on plastic waste. They’re reusable, can be broken down, and reduce our use of single-use plastics. This helps us live a zero-waste life and lowers the environmental impact of storing food.
Q: Can beeswax wraps be used for all types of food?
A: Yes, beeswax wraps are good for many food storage needs. They work well for fruits, veggies, cheese, and sandwiches. But, they’re not best for raw meat or foods that are very wet.
Q: How do beeswax wraps compare to plastic wrap?
A: Beeswax wraps are better for the planet and can be used again. They don’t harm food with chemicals and can break down naturally. They might not seal as tightly as plastic wrap, but they’re a greener choice for the kitchen.
Q: Are there any challenges in making beeswax wraps?
A: Yes, finding good, food-grade beeswax and getting the wax-to-fabric ratio right can be tough. Making mistakes can lead to stiff or not-coated wraps. It’s important to use 100% cotton fabric with a tight weave for success.
Q: What is the future outlook for beeswax wraps?
A: Beeswax wraps are set to become more popular in eco-friendly living. As we learn more about plastic pollution, these wraps will likely become more common. New materials and ways to make them might make them even better for our planet.
Q: Are beeswax wraps cost-effective?
A: Yes, beeswax wraps save money over time. They might cost more to make than plastic wrap at first. But, since they can be used many times, they’re cheaper in the long run than disposable plastic.
Source Links
- https://homesteadandchill.com/diy-homemade-beeswax-wraps/?srsltid=AfmBOoq5NYiHqySbQqOaDr69fk3scWl3zcNs00hSTYDVG-gZkhdVmRd6 – DIY: Easy Homemade Beeswax Wraps (Reusable Food Wraps)
- https://food52.com/blog/25579-how-to-make-reusable-beeswax-food-wrap?srsltid=AfmBOooh4poU2hoV0ZUB-mO0tBbABanZvOI_N1pg1S9jC2185pdono9R – A Reusable Food Wrap You Can DIY in 5 Minutes
- https://www.goodhousekeeping.com/home/craft-ideas/g25642328/diy-beeswax-reusuable-wraps/ – Why You Should Start Using Beeswax Wraps for Your Food
- https://homesteadingfamily.com/homemade-beeswax-wraps-for-food-storage/ – Homemade Beeswax Wraps For Food Storage
- https://www.farmhouseonboone.com/how-to-make-beeswax-wraps/ – How To Make Beeswax Wraps
- https://en.wikipedia.org/wiki/Beeswax_wrap – Beeswax wrap
- https://abeego.com/blogs/kfa/who-invented-beeswax-wraps?srsltid=AfmBOopUY06pZmv8VSKGqfZzQw0C5ZesxDJofKRQL3Xeg0zbUnuxj22U – Who Invented Beeswax Wraps?
- https://madebybees.ca/blogs/the-buzz/the-benefits-of-using-beeswax-food-wraps?srsltid=AfmBOop6mUbh_fCBmdzR__IpI76MPqw1X3RMO0nWhJsC_LD3aptBpI_H – The Benefits of Using Beeswax Food Wraps
- https://www.idealwrap.com/blogs/ideal-wrap-blog/pros-and-cons-of-beeswax-food-wrap – The Pros and Cons of Beeswax Food Wrap
- https://www.chefsouschef.com/beeswax-wraps/ – How to Make Reusable Beeswax Food Wraps | Chef Sous Chef
- https://abeautifulmess.com/make-your-own-beeswax-food-wraps/ – Make Your Own Beeswax Food Wraps!
- https://www.sugarmaplefarmhouse.com/diy-beeswax-wraps-recipe/ – DIY Beeswax wraps
- https://blog.mountainroseherbs.com/the-complete-guide-to-diy-beeswax-wraps-including-a-beeless-vegan-food-wrap – The Complete Guide to DIY Beeswax Wraps (AND Beeless Vegan Food Wraps!)
- https://www.beeswrap.com/blogs/blog/how-to-use-and-care-for-bees-wrap?srsltid=AfmBOopd6fCW2aY5JoV8nUkRIa4SDZnTniWPyNzsa998SqZKR9-wBs4j – How to Use and Care for Bee’s Wrap®
- https://beebeewraps.com/blogs/news/what-are-beeswax-wraps-used-for?srsltid=AfmBOoqPo5xdt2oc2MJeHWVsxrdS811IAMkbZUuEN9OVj_VTlZKPDMoy – What are Beeswax Wraps Used for?
- https://honeybeegood.co.uk/blogs/great-resources-for-planet-friendly-living/10-clever-uses-for-beeswax-wraps-that-you-may-not-have-thought-of – 10 surprising uses for beeswax wraps that you may not have thought of
- https://superbee.me/how-to-use-beeswax-wraps/?srsltid=AfmBOooS7pCREAIElT1ixVso-gWMvY4I0q4h1hNb6ZRgmDtZLuDsg6fe – 15 Different Ways to Use Your SuperBee Beeswax Wraps
- https://www.naturebeewraps.ca/blogs/whats-buzzin/the-ultimate-guide-to-beeswax-wraps-eco-friendly-food-storage-solutions-vs-nasty-plastic-wrap?srsltid=AfmBOornpqKNhkW0yXDaJXX1YqPBMVx0a6pF72Q7yBgWSZw5SuYvpe1S – The Ultimate Guide to Beeswax Wraps: Eco-Friendly Food Storage Solutio
- https://www.epicurious.com/expert-advice/best-reusable-beeswax-wrap-article – The Best Reusable Beeswax Wrap
- https://hellohomestead.com/i-tried-to-make-beeswax-food-wraps-heres-how-it-went/ – I tried to make beeswax food wraps. Here’s how it went. | Hello Homestead
- https://abeego.com/blogs/kfa/who-invented-beeswax-wraps?srsltid=AfmBOooMFD0uVJnmHEO_tI7qOFTtrUlzKxJIoMGASVCBA_kNNkbo8bVG – Who Invented Beeswax Wraps?
- https://ucanr.edu/blogs/blogcore/postdetail.cfm?postnum=58778 – Beeswax Food Wraps – Possible Alternative to Film Wraps
- https://reyiko.com/blogs/reyiko-news/why-beeswax-food-wraps-are-a-game-changer-for-zero-waste-living?srsltid=AfmBOoqs6fMBW5iIyhIiHY_b6AcoPPdbQSmeMEyCqgbtXUFULMXs7QNt – Why Beeswax Food Wraps are a Game-Changer for Zero-Waste Living?
- https://www.amesfarm.com/blogs/showcase-ames-farm-honey-retailer/how-switching-to-beeswax-wraps-can-help-save-the-planet?srsltid=AfmBOorCYoGl2bZqyOnFl6-jZ93ioLqRXhkipfWlecbwIHaEgN75-JV8 – How Switching to Beeswax Wraps Can Help Save the Planet